Tag: eSIM Guide

  • How to Activate eSIM on Samsung in Nigeria (2025 Guide)

    How to Activate eSIM on Samsung in Nigeria (2025 Guide)

    In 2025, global eSIM adoption crossed 320 million active users, with Africa becoming one of the fastest-growing regions. Nigeria alone has seen a 65% increase in eSIM usage among travelers, remote workers, and online entrepreneurs who want faster, cheaper, and more flexible mobile connectivity.

    As more Nigerians upgrade to Samsung devices that support eSIM, knowing how to activate eSIM on Samsung has become essential. Whether you’re preparing for travel, switching networks, or trying to avoid high roaming costs, eSIM technology makes everything smoother and far more convenient.

    What You Need Before You Activate eSIM on Samsung

    Before you begin, here’s what you must have ready:

    • Confirm your Samsung is eSIM-compatible

    Not all Samsung phones support eSIM. If you’re not sure, check the updated list of Nigeria-ready Samsung eSIM devices. Before you activate an eSIM on Samsung, make sure your device actually supports eSIM. You can confirm this by checking Samsung’s official specs or using the global GSMA eSIM device checker

    • Make sure your phone is carrier-unlocked

    If your Samsung is locked to a specific network (like AT&T or Verizon), eSIM activation won’t work.

    • Have your QR code on another screen

    You cannot scan a QR code on the same device you’re activating.

    Use a laptop, another phone, or print it out.

    • Ensure your internet connection is stable

    Your Samsung must stay connected during installation.

    Even a small interruption can cause failure.

    • Know that each QR code works only once

    Once you scan it, you cannot reuse it or transfer it to another device.

    • Don’t delete your eSIM after activation

    If you remove it, it becomes permanently unusable. This is a common mistake new users make, avoid it.

    How to Activate eSIM on Samsung Using a QR Code

    This is the easiest and most popular method.

    Here’s how to activate eSIM on Samsung using the QR code from Nexar.

    Step 1: Check your email for your QR code

    Open the email we sent you and check for your QR code

    Step 2: Open your Samsung Settings

    Go to:

    Settings → Connections → SIM Card Manager → Add eSIM

    For model-specific screenshots and the exact menu labels you’ll see while scanning the QR code, follow Samsung’s official guide on how to use an eSIM with your samsung phone.

    Step 3: Scan your eSIM QR code

    Your phone will open the camera.

    Point it at the QR code on another screen or on paper.

    Step 4: Follow the on-screen prompts

    Tap Add or Confirm depending on your Samsung model.

    Step 5: Wait for installation to complete

    Don’t close the screen or turn off your internet.

    Detailed Steps (QR Method)

    Step 1:

    Go to Settings → Connections

    Step 2:

    Tap SIM Card Manager

    Step 3:

    Tap Add mobile plan

    Step 4:

    Choose Scan carrier QR code

    Step 5:

    Tap Add/Confirm to save your eSIM profile.

    How to Manually Activate eSIM on Samsung (No QR Code)

    If your QR code isn’t scanning, or you prefer manual activation, this method is for you.

    Step 1: Open your email

    Open your email for the SM-DP+ address + Activation Code

    Every Nexar eSIM comes with both options.

    Step 2: Open Samsung Settings

    Go to:

    Settings → Connections → SIM Card Manager → Add eSIM

    Step 3: Scan QR code

    Choose “Scan QR from service provider”

    Then tap Enter activation code manually

    Step 4: Enter the SM-DP+ details

    Copy and paste from your email (or type manually) then tap Add/Confirm

    Step 5: Turn ON your eSIM

    Once installation is done, toggle it ON.

    Detailed Steps (Manual Method)

    Step 1:

    Go to Settings → Connections

    Step 2:

    Open SIM Card Manager

    Step 3:

    Tap Add eSIM

    Step 4:

    Tap Scan QR from service provider → Add using activation code

    Step 5:

    Enter the activation code and SM-DP+ details

    Step 6:

    Tap Confirm/Add and turn ON your eSIM

    How to Use Your eSIM on Samsung After Installation

    After you activate eSIM on Samsung, here’s how to actually use it when you land abroad:

    Step 1: Turn ON your eSIM

    Go to:

    Settings → Connections → SIM Card Manager

    Toggle your eSIM ON and set it as Mobile Data.

    Step 2: Turn ON Data Roaming

    Go to:

    Settings → Connections → Mobile Networks → Data Roaming

    Your eSIM will now connect to the local network automatically.

    Why Choose Nexar for Your Samsung eSIM? (Conversational)
    Activate eSIM on samsung

    If you’re a Nigerian, the truth is simple: not all eSIM providers are created for you.

    Here’s why Nexar is the best option:

    • Nexar works specifically for Nigerians

    You don’t need a foreign card, PayPal, or USD balance. You pay in Naira, instantly.

    No delays, no stress, no long waits.

    • Wide network coverage

    Nexar eSIMs work in over 100+ countries.

    Perfect for Nigerians traveling for school, work, tourism, or japa.

    • Affordable and transparent pricing

    No hidden charges. Just choose your destination and get your plan.

    • 24/7 Nigerian customer support

    You don’t talk to bots, real humans assist you.

    • Beginner-friendly installation

    Even if it’s your first time using an eSIM, Nexar guides you step-by-step.

    FAQs About Samsung eSIM Activation in Nigeria

    1. Can all Samsung phones use eSIM?

    No. Only specific models (S21 and newer + some A-series + Fold + Flip) support eSIM.

    2. Do I need Wi-Fi to activate my eSIM on Samsung?

    Yes. Your phone must stay connected during setup.

    3. What if my QR code is not scanning?

    Use the manual activation method instead.

    4. Can I use the same QR code on two phones?

    No. Each QR code works once only.

    5. What happens if I remove my eSIM?

    It becomes invalid permanently.

    Always avoid deleting your eSIM.

    6. Can I pay for Nexar eSIM in Naira?

    Yes. Nexar is fully Nigeria-friendly.

    Final Thoughts

    It is easy to activate eSIM on Samsung in Nigeria as long as you follow the correct steps. Whether you choose QR or manual installation, your eSIM will be ready to use in minutes. To avoid installation errors, first confirm that your Samsung model supports eSIM. You can quickly verify this using our updated Nexar list of eSIM-compatible devices in Nigeria.

    And with Nexar, Nigerians get fast delivery, affordable plans, and reliable support tailored to African travelers.

    Ready to activate your Samsung eSIM?

    Visit the Nexar website and get your eSIM instantly.
  • Step by Step Guide to Setting Up a Data eSIM on Your iPhone

    Setting up a Data eSIM on Your iPhone has become one of the easiest ways to enjoy reliable internet while travelling or when you need instant connectivity without inserting a physical SIM card. The process is fast, secure, and supported on most modern iPhones.

    With a Data eSIM on Your iPhone, you can stay online for maps, browsing, social media, streaming, and messaging apps that use the internet. Nexar provides affordable and easy to activate plans that work smoothly on supported devices.

    This guide walks you through everything you need to know about using a Data eSIM on Your iPhone, how to activate eSIM on iPhone, and how to install a data eSIM for iPhone manually or with a QR code.

    Data eSIM on Your iPhone

    How a Data eSIM Works on Your iPhone

    A Data eSIM on Your iPhone is a digital SIM built into your device. It removes the need for a physical SIM card and allows your phone to store multiple eSIM profiles. This makes it extremely useful for travel because you can switch between plans anytime. A Data eSIM on Your iPhone gives you internet only. It does not support traditional sms or voice calls. For calls and messages, use apps like WhatsApp, FaceTime or Skype.

    This makes the data eSIM for iPhone perfect for travellers who only need high speed internet without roaming charges.

    Requirements Before You Activate eSIM on iPhone

    You can also learn more about Apple’s requirements here

    How to Purchase a Data eSIM for iPhone from Nexar

    Before we get started on setting up your eSIM, it’s good to know that Nexar sells affordable data eSIM plans for travellers and everyday users. You can buy and activate your plan instantly, without waiting for physical delivery or long verification steps. Here’s how to purchase one from Nexar:

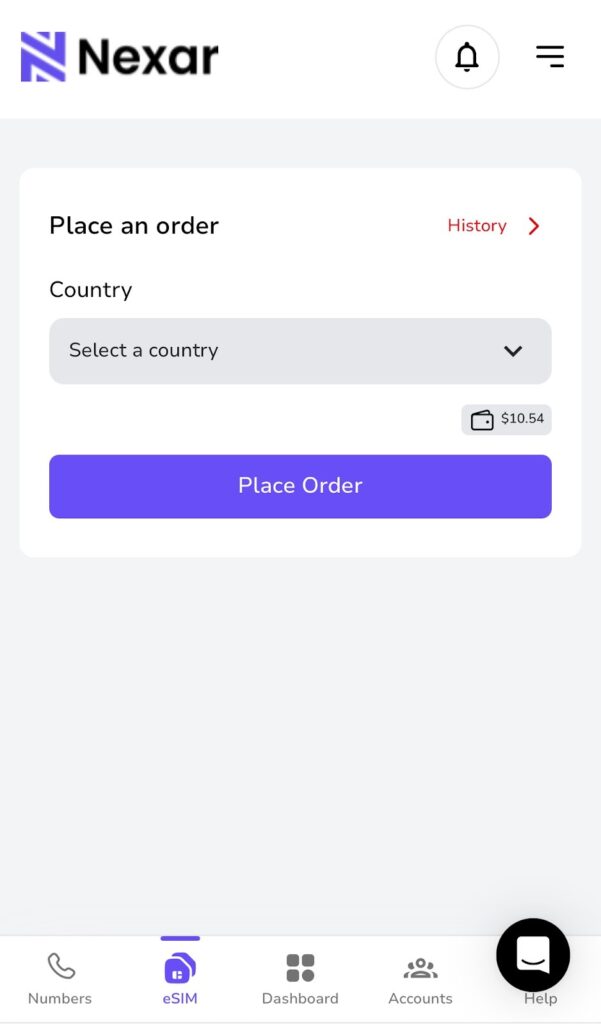
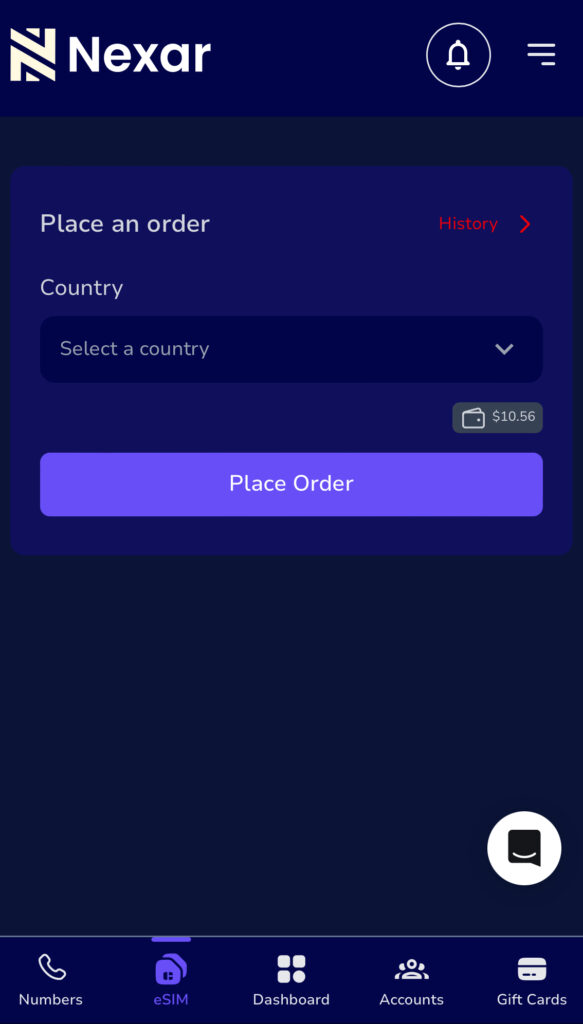
    1. Sign up by clicking this link.
    2. Select the country you are travelling to
    3. Choose your preferred data plan
    4. Tap Place Order

    Remember that the Data eSIM on Your iPhone will only work when you are physically inside the selected country.

    How to Activate Your Data eSIM on Your iPhone

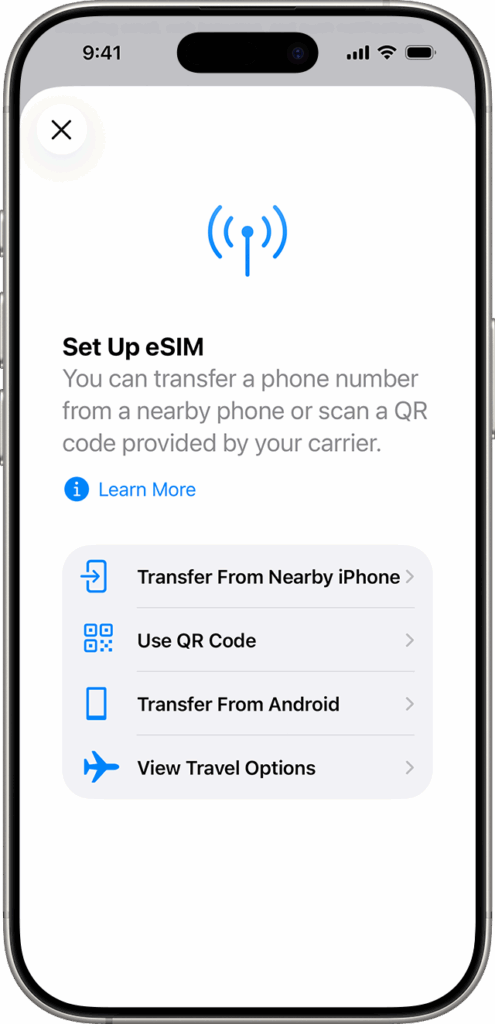
    There are several ways to activate eSIM on iPhone. Different methods work depending on your carrier, device model and region. Below are the supported activation methods following Apple’s setup style.

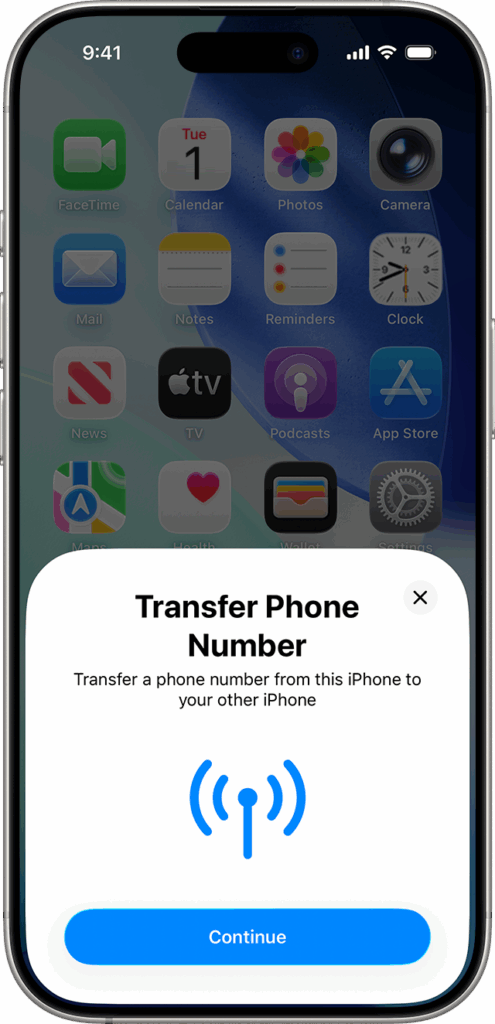
    1. Activate eSIM on iPhone using Quick Transfer

    If you are moving a line from your old iPhone to a new one, you can use Quick Transfer.

    1. Make sure both phones are signed in with the same Apple ID
    1. Keep Bluetooth on
    1. Place both phones close
    1. Go to Settings, tap Cellular, then tap Add eSIM
    1. Choose a number to transfer
    1. Follow the instructions on the old iPhone
    1. Wait for activation

    This method is great for personal numbers but not necessary for a travel eSIM.

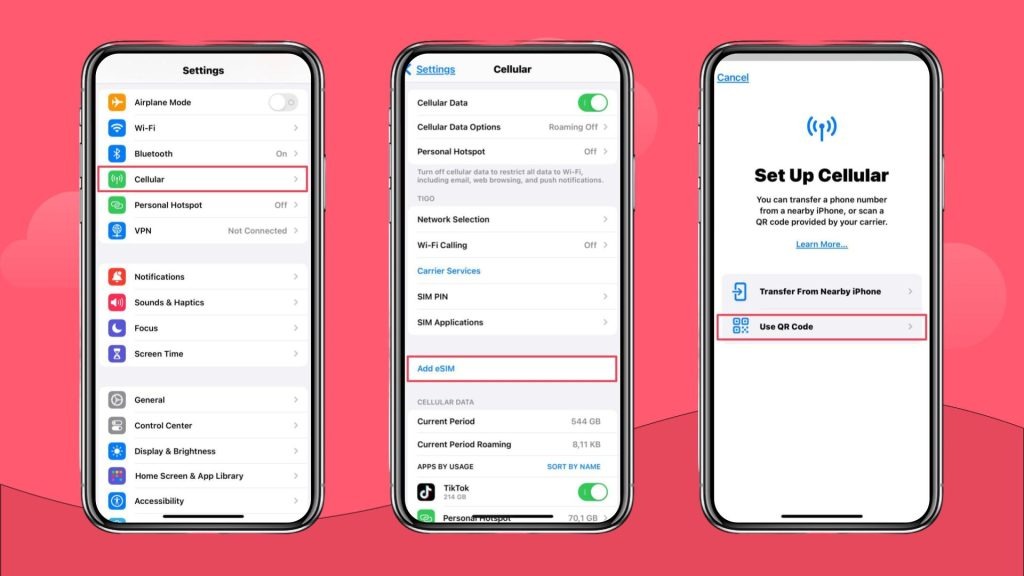
    2. Activate eSIM on iPhone using QR Code

    If your provider gives you a QR code, follow these steps.

    1. Open Settings
    1. Tap Cellular or Mobile Data
    1. Tap Add Cellular Plan
    1. Scan the QR code
    1. If asked, enter the confirmation code
    1. Choose a label for your plan
    1. Select the plan as data only

    Your Data eSIM on Your iPhone should appear under Cellular Plans.

    How to Manually Install a Data eSIM for iPhone

    Sometimes, your provider lets you enter the eSIM details manually. Here’s how to do it.

    • Open Settings
    • Tap Cellular
    • Tap Add Cellular Plan
    • Tap Enter Details Manually
    • Enter the SM DP Plus Address
    • Enter the activation code
    • Enter the confirmation code if required
    • Choose a label
    • Select it as data only

    This is the method most travel eSIM users prefer.

    How to Connect to Mobile Data After Installation

    After installing your Data eSIM on Your iPhone, turn it on and connect to mobile data.

    • Go to Settings
    • Tap Cellular
    • Select your new eSIM plan
    • Turn on Data Roaming
    • Tap Cellular Data Network and input APN if required
    • Return to Cellular
    • Select your eSIM for cellular data
    • Turn OFF Allow Cellular Data Switching

    Your data eSIM for iPhone should now connect to a supported network.

    If you prefer visual instructions, watch this short video guide.

    How to Confirm Your eSIM is Working

    • Go to Settings
    • Tap Cellular
    • Look for your new data plan
    • It must show connected or activated
    • If you see signal bars beside the eSIM label, it is active.

    Important Notes When Using Nexar eSIM

    Follow the steps exactly as shown to avoid installation issues.

    1. Always use a strong VPN
    2. Nexar eSIM is data only
    3. Use WhatsApp, FaceTime, Messenger or Skype for calls and texts
    4. Your eSIM will only work in the purchased country
    5. Install the Data eSIM on Your iPhone using your browser and settings app

    Travelling soon? Buy a Nexar eSIM.

    A Data eSIM on Your iPhone is perfect for travellers because it prevents roaming charges. Once you land in your destination, your eSIM immediately connects so you can use maps, ride hailing apps, banking apps, translation tools, and social media. If you use an android device, you can also install an eSIM on your device after reading this guide.

    Final Thoughts

    Setting up a Data eSIM on Your iPhone is simple when you follow clear steps. You can activate eSIM on iPhone using QR code, manual setup, or carrier activation. Nexar provides a reliable data eSIM for iPhone that works for travel and everyday use. With the right VPN, a stable WiFi connection, and the correct installation steps, you can enjoy fast and secure data anywhere your plan supports.

    If you need reliable travel data, purchase your eSIM from Nexar and follow the instructions in this guide for a smooth setup.

  • Step-by-Step Guide to Setting Up a Data eSIM on Android Device

    Lagos to Ghana is only a few hours by road, but the moment you cross the Lomé border, your SIM card stops working. Suddenly, you can’t load maps, send messages, or even request a ride. For many travelers, this is a common frustration and that’s why a Nexar eSIM on Android device makes all the difference.

    With an eSIM from Nexar, you can stay connected without swapping physical SIM cards, buying a new one at the border, or worrying about losing contact. Wondering how that’s even possible? In this article, we will show you. Let’s get started.

    eSIM on Android

    What is a Nexar eSIM?

    An eSIM is a digital SIM that lets you activate a mobile plan without a physical card. At Nexar, our eSIM is designed for data only. This means you cannot use it for traditional calls or SMS texts, but you can browse the internet, use maps, and stay active on your favorite apps. For calls and messages, internet-based platforms such as WhatsApp, FaceTime, or Skype work perfectly using the eSIM data.

    It is important to note that a Nexar eSIM works only in the country where it was purchased. For example, if you buy an eSIM on Android for Ghana, it will work there but not outside the country.

    Before You Start: Check Device Compatibility

    Not all Android phones support eSIM, so the first step is confirming compatibility. Make sure your device is:

    • eSIM-compatible
    • Unlocked from any specific network
    • Running on updated software

    Also, ensure you have a stable Wi-Fi connection because the setup process requires internet access.

    How to Activate Your Nexar eSIM

    Once you purchase an eSIM from Nexar, activation is simple.

    1. Log in to your Nexar account.
    2. Go to History.
    3. Scroll right and tap the three dots.
    4. Click View Details.
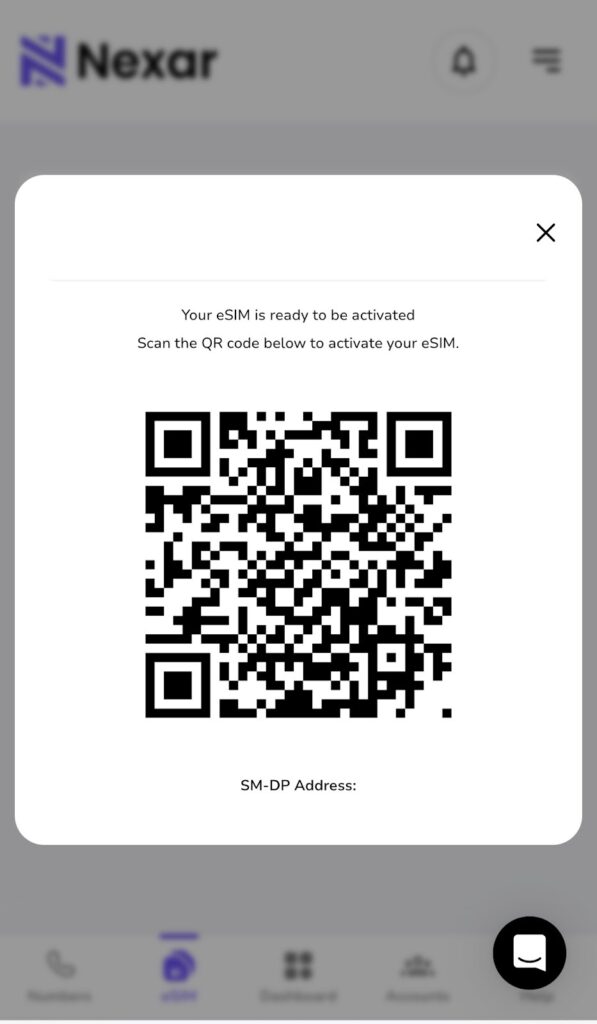
    5. You will see a QR code. Screenshot it or open it on another device.
    6. On your phone, go to Settings > Mobile Network > Add eSIM.
    7. Select Use QR Code and scan it.
    8. Wait for the installation to complete.

    That is it. Your eSIM on Android will be active and ready for use.

    📺 Watch this short tutorial on Youtube: Learn how to activate your Nexar eSIM

    How to Set Up a Data eSIM on Android Phone

    Many people ask how to set up a data eSIM on Android phone, and the process is easier than it sounds. There are two main ways to install an eSIM on Android.

    Method 1: Scanning the QR Code

    1. Open Settings on your Android phone.
    2. Tap Network & Internet.
    3. Select Mobile Network then Add eSIM.
    4. Choose Use QR Code.
    5. Scan the QR code from your Nexar dashboard.
    6. Enable Mobile Data and Data Roaming.
    7. Adjust your APN settings if required.

    Method 2: Manual Entry

    1. In Settings, go to Network & Internet.
    2. Tap Mobile Network then Add eSIM.
    3. Select Enter details manually.
    4. Input the SM-DP+ Address and Activation Code from Nexar.
    5. Leave the confirmation code blank.
    6. Save and activate the eSIM.

    Tip: If you face issues with activation, using a VPN can help smooth the process.

    Device-Specific Quick Guides

    Samsung Devices

    • Go to Settings > Connections > SIM Manager > Add eSIM
    • Tap Scan QR Code or Enter Activation Code manually
    • Ensure data roaming is enabled

    Xiaomi Devices

    • Go to Settings > Mobile Networks > Manage eSIM > Add eSIM
    • Scan the QR code or enter activation details manually
    • Set eSIM as the default for mobile data and enable roaming

    Other Android Devices

    • Go to Settings > Network & Internet > SIM card or Mobile Network > Add eSIM
    • Select QR code or manual option
    • Follow prompts to finish setup

    Common Issues and Solutions

    • Outdated software → Update your phone before installing. f your software is outdated, your phone may not recognize the eSIM. Go to Settings > System > Software Update, download the latest version, and restart your device before trying again.
    • Network errors → Restart device and ensure Wi-Fi is strong.
      Sometimes poor connectivity interrupts the setup. Restart your phone, switch to a stronger Wi-Fi connection, and retry scanning the QR code or entering details. If possible, avoid using public Wi-Fi during activation.
    • Expired QR code → Always use the code provided in your Nexar dashboard.
      QR codes have a limited validity period. If you see an error saying the code has expired, log back into your Nexar account, navigate to History > View Details, and download a fresh code.
    • Installation stuck → Try manual entry with the SM-DP+ Address and Activation Code.
      If the QR method freezes or doesn’t complete, choose the Enter details manually option in your phone settings. Input the SM-DP+ Address and Activation Code from your Nexar dashboard, then save to complete setup.

    If the problem persists, check your APN settings or contact Nexar support.

    Frequently Asked Questions

    Q: Can I use my eSIM on Android alongside my regular SIM?

    Yes. Most modern Android phones support dual SIM, which means you can use your physical SIM for calls and SMS while your eSIM handles data.

    Q: What happens if I change my phone?

    Your eSIM profile is tied to one device at a time. If you switch phones, you will need to scan the QR code again or request a new one from your provider.

    Q: Is it difficult to learn how to set up a data eSIM on Android phone if I’m not tech-savvy?

    Not at all. Nexar makes the process simple. Once you receive your QR code, it takes less than five minutes to activate and start browsing.

    Final Thoughts

    Traveling without internet access can be stressful, but with an eSIM on Android, you can stay online wherever you go. If you have ever wondered how to set up a data eSIM on Android phone, Nexar makes it easy with clear instructions and quick activation. Whether you are heading to Ghana, Europe, or anywhere else, you can keep your apps, maps, and chats running smoothly.

    Will you be travelling soon? Get started today with Nexar eSIM and stay connected wherever you travel.